Sending Invoices and Getting Paid
Email invoices to customers, receive online payments and record cash/bank transfer payments
Sending Invoices and Getting Paid
Overview
After creating an invoice, you need to send it to the customer and collect payment. Cooledge makes this simple with email invoices and online payment links.
What this guide covers:
- Sending invoices via email
- How customers pay online
- Recording manual payments (cash, bank transfer)
- Checking invoice status and payment history
Sending an Invoice
How to Send
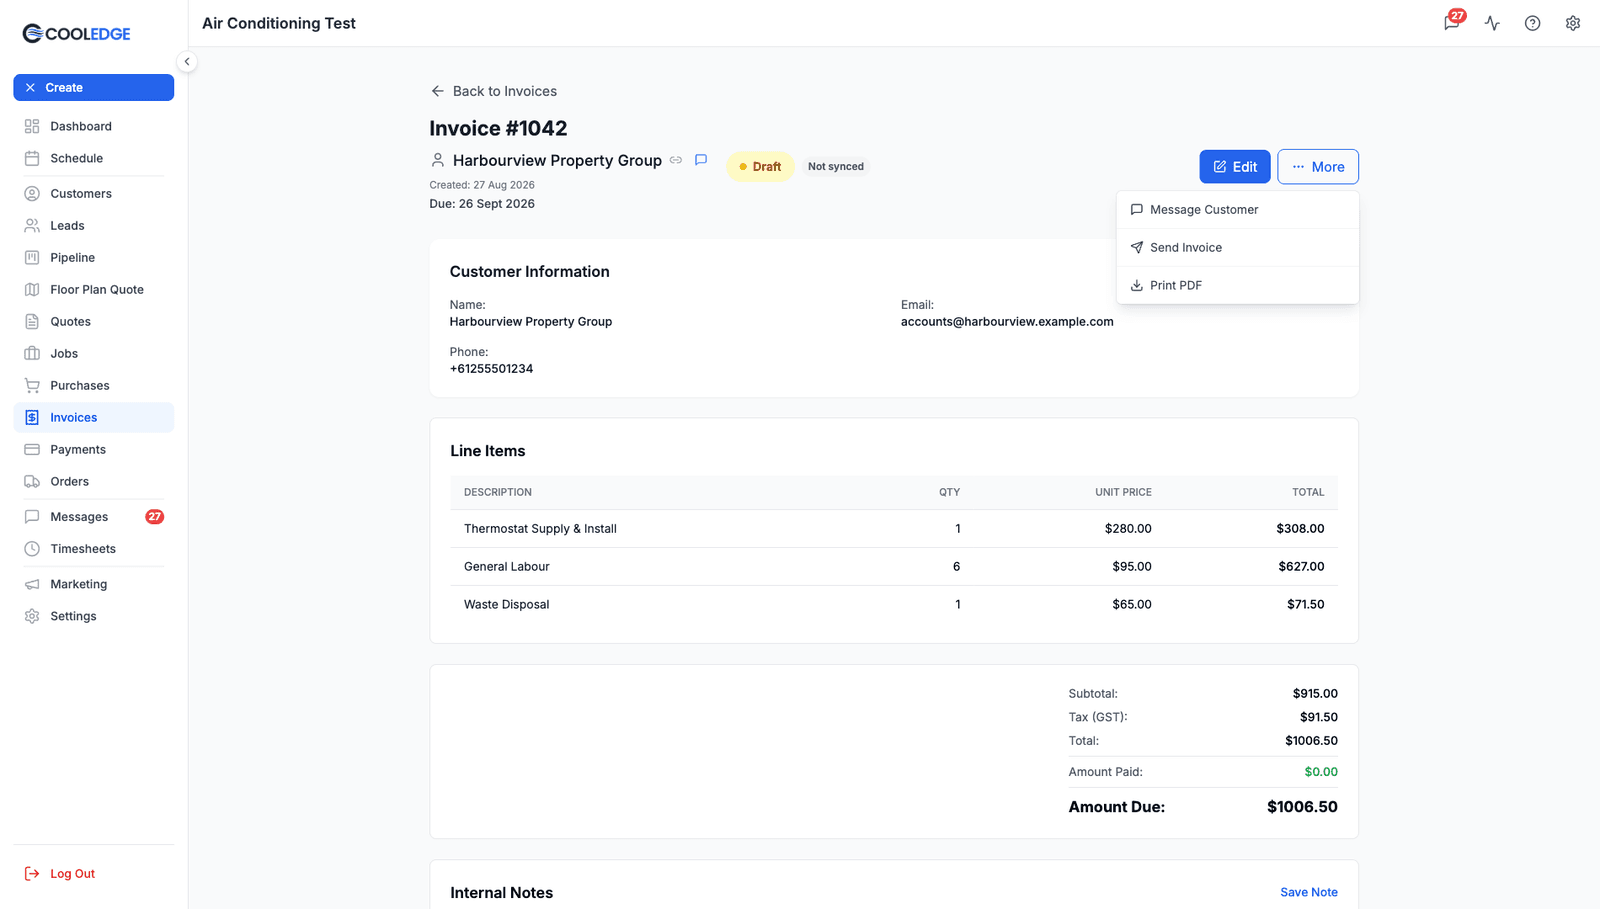
- Open the invoice detail page
- Click More (the ••• button, top right)
- Choose Send Invoice. On an invoice you have already sent, the same menu reads Resend Invoice
- The send composer opens, where you choose the channel and check the message before anything goes out
- Send. Cooledge then marks the invoice Sent, records the sent date and time, and includes a payment link
The composer is the same one used for quotes, so the options and the recipient rules are covered in Sending Documents.
For an invoice raised from a job, the email follows the job's linked contact person first. If the job has no linked contact, or that contact has no email, it goes to the customer's default email.
You can also send straight from the editor: Send to Customer sits at the top of the invoice editor, and becomes Save & Send to Customer if you have unsaved changes.
Customer details on the email: The invoice will show the customer's name and address as they were when the invoice was prepared. If the customer has moved or changed contact details since the job was done, don't worry - the invoice still shows the correct information for that specific job. This is intentional and keeps records accurate.
What the Customer Receives
The email looks professional and includes your business logo and name, the invoice number and amount due, a breakdown of what they're paying for and a button through to a secure payment page. Your business contact details are included too, so everything matches your branding.
Invoice Status Changes
When you send an invoice:
- Status changes from "Draft" → "Sent"
- A "Sent at" timestamp is recorded
- The invoice appears in your customer's online portal (if they have access)
You can send an invoice multiple times if needed (customer lost the email, etc.). Each send updates the "Sent at" time.
How Customers Pay Online
The Payment Page
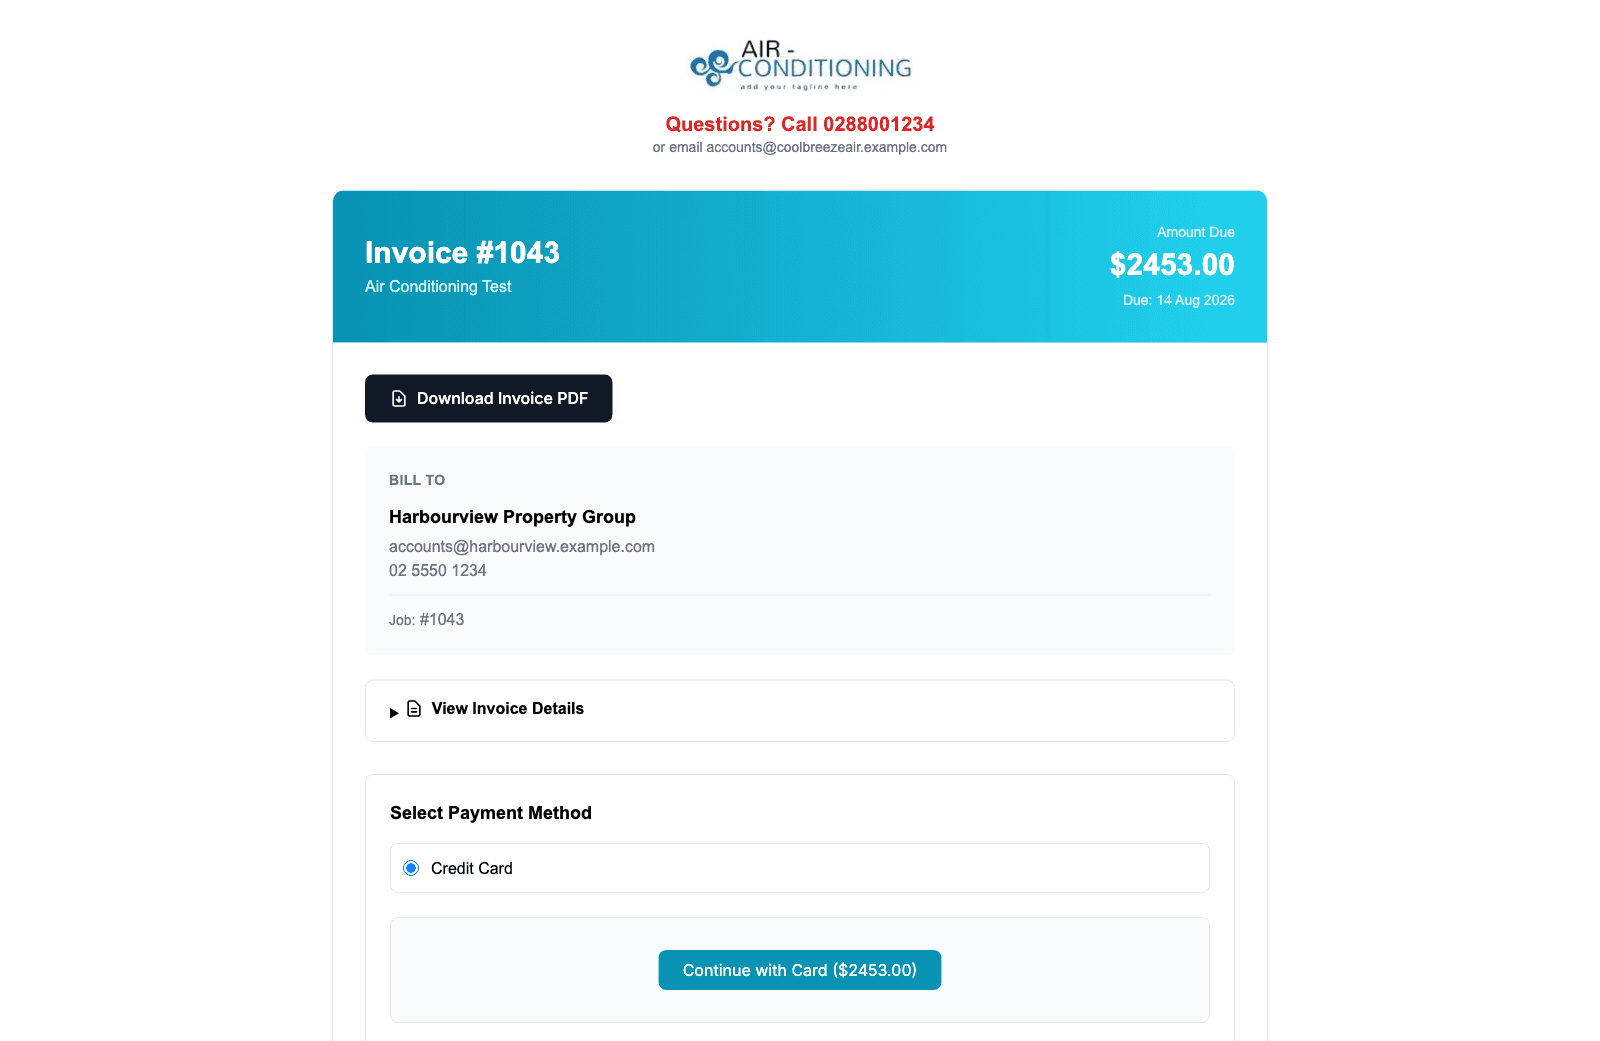
When a customer opens the payment link, they see:
- Your logo, business name and a "Questions? Call ..." line with your contact details
- The invoice number, the amount due and the due date
- Who the invoice is billed to, and the job number if it came from a job
- View Invoice Details, which expands the full line-item breakdown
- Select Payment Method, then a secure card form powered by Stripe
The card button shows the exact figure they will be charged, which is the amount due. Cooledge adds no card surcharge: from 1 October 2026 card surcharges are not allowed in Australia on Visa, Mastercard, eftpos or American Express, and that applies to invoices you sent before then too. See Stripe Payments if you want to cover card fees in your pricing.
After Customer Pays
When payment processes:
- Customer sees confirmation message
- Customer receives payment receipt via email
- You receive instant notification (email and push notification)
- Invoice status updates automatically
- Payment is recorded with date, amount and method
The money goes directly to your Stripe account, not through Cooledge.
Invoice Status After Payment
Full Payment:
- Status changes to "Paid"
- Amount Due = $0
- Invoice shows as fully paid
Partial Payment:
- Status changes to "Part-Paid"
- Amount Due = reduced by payment amount
- Customer can pay the remaining balance later
Every payment lands in the invoice's Payment History, with the amount, the method, the date and any reference you entered, so you can see exactly how a Part-Paid balance was reached.
Recording Manual Payments
Sometimes customers pay outside the online system - cash, bank transfer, check. You need to record these manually so the invoice shows as paid.
How to Record a Payment
- Open the invoice detail page
- Click "Record Payment" button
- Fill in:
- Amount - how much they paid
- Payment method - Cash, Bank Transfer, Check, etc.
- Date - when you received it (defaults to today)
- Reference/Notes (optional) - check number, bank reference, etc.
- Click "Record Payment"
The payment is added to the invoice immediately and the status updates.
Once it is recorded, the payment shows in Payment History. You can reverse a payment but you cannot edit it, so check the amount before you save.
Multiple Manual Payments
You can record multiple payments if a customer pays in installments:
- Record $500 cash deposit → Invoice shows Part-Paid
- Record $1,000 bank transfer next week → Invoice shows Part-Paid with less owing
- Record $500 final payment → Invoice shows Paid
Each payment is timestamped and tracked separately.
Invoice Status Explained
Invoices move through different statuses:
Draft
- Invoice created but not sent yet
- Customer hasn't seen it
- You can still edit details
- Shows as "Draft" in the invoice list
Sent
- Email sent to customer
- They can pay online via payment link
- No payments received yet
- Shows as "Sent" in the invoice list
Part-Paid
- Invoice sent AND some payment received
- Customer owes remaining balance
- Shows as "Part-Paid" with amount due
- Can accept more payments
Paid
- Full amount received
- No balance owing (Amount Due = $0)
- Shows as a green Paid badge
- Job can be marked as complete
Overdue
- Not a status you set. It is calculated
- An invoice shows Overdue when it is Sent and its due date has passed
- A Part-Paid invoice does not flip to Overdue, even past its due date. It keeps showing Part-Paid, so check the Overdue tile and the part-paid invoices separately when you chase debtors
Void
- A cancelled invoice, raised in error or replaced
- Void it from More > Void Invoice
- It stays in the list for the audit trail but stops counting towards what you're owed
On the Mobile App
The mobile app has no separate Invoices page. Tapping Invoices takes you to the app's Search screen with the Invoices filter already applied, and that screen is the invoice list. It carries the same status badges as the portal, worked out the same way, so a Sent invoice past its due date shows the red Overdue badge there too.
What the portal has and the mobile list does not:
- No summary tiles. There is no Outstanding, Overdue, Collected, Draft Invoices or Ready to sync row to tap
- No Void filter. The status pills run All, Draft, Sent, Overdue, Part-Paid and Paid. A voided invoice still appears under All with a red Void badge, but you cannot filter down to voided invoices
- Draft base invoices are hidden. The first, still-unsent invoice on a job is that job's billing container rather than a document, so the mobile list leaves it out. Open it from the job instead
The search box matches the invoice number, the customer name and the site address.
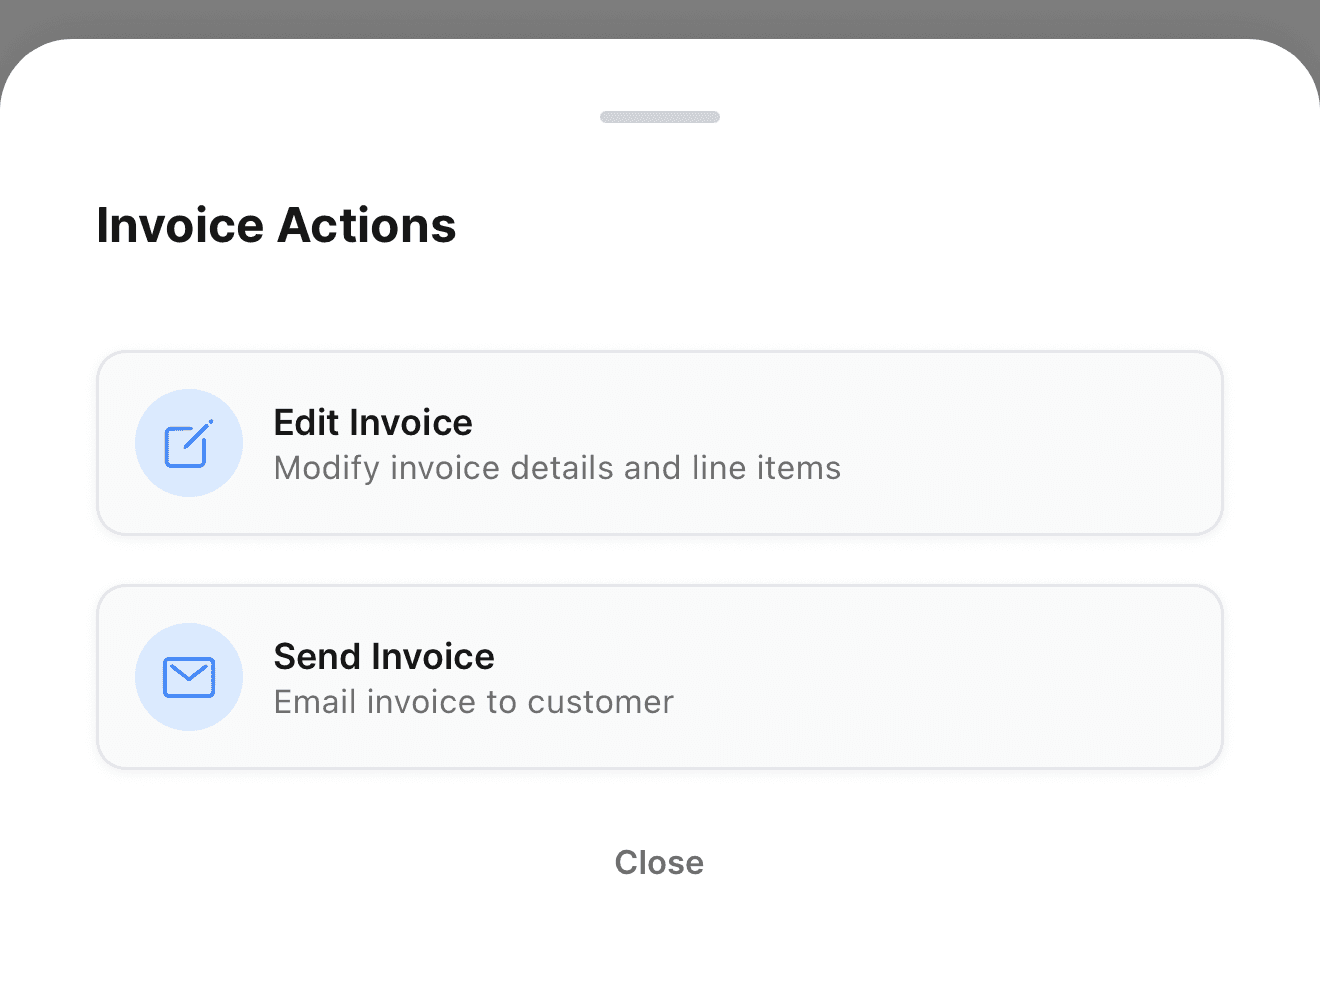
Sending from mobile. Open the invoice, tap the ••• button beside Edit Invoice and the Invoice Actions sheet slides up. On a Draft it offers Send Invoice; once the invoice has gone out the same row reads Resend Invoice. Either opens the same send composer the portal uses, so email and SMS both work and the recipient rules are identical. The small print under the row reads "Email invoice to customer", which undersells it: the composer that opens can send an SMS as well.
Void Invoice sits in that sheet too, on Draft and Sent invoices, with one exception: a job's first invoice is not offered it, because voiding the job's billing container would leave the Billing tab with nothing to bill against. On a completed job, an owner or admin can close that draft first invoice with No further billing from the job instead.
Payment History
Every payment on an invoice is tracked in the Payment History section:
What you see for each payment:
- Date and time received
- Amount paid
- Payment method (Online, Cash, Bank Transfer, etc.)
- Who recorded it (for manual payments)
- Transaction reference (for online payments)
This gives you a complete audit trail.
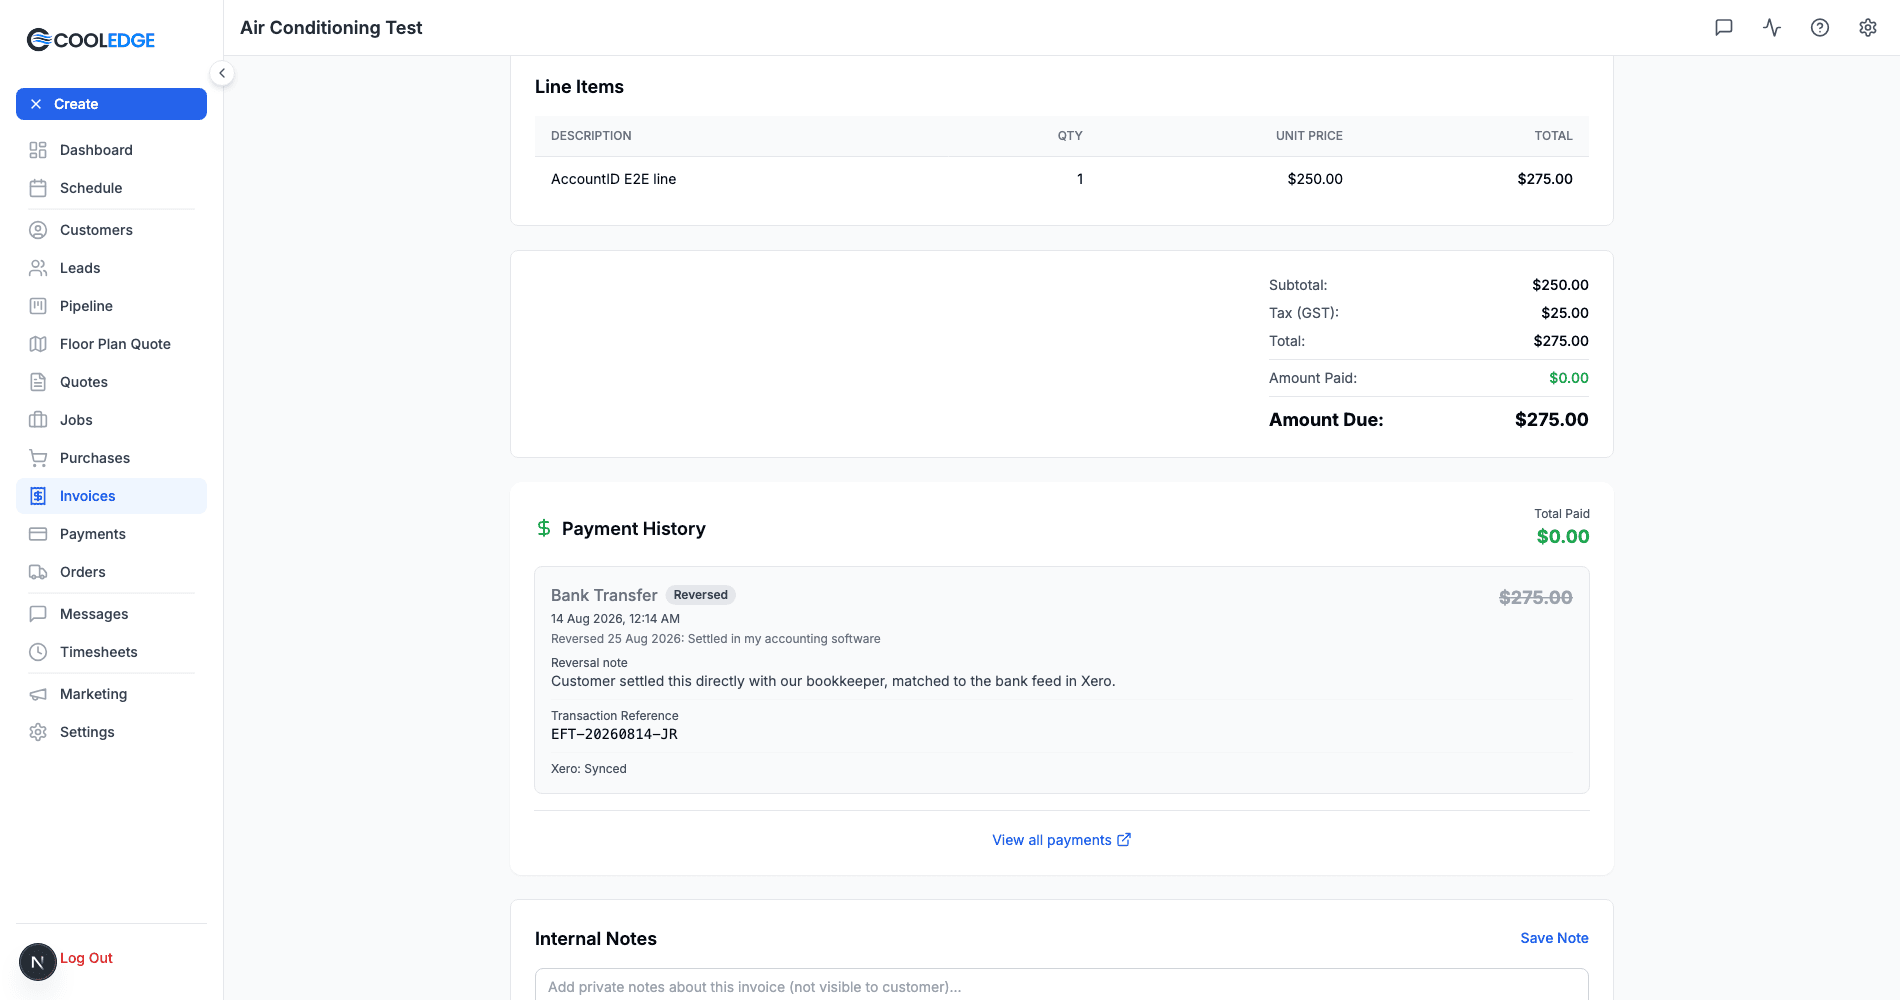
Correcting a payment. If a payment was recorded by mistake, refunded or settled somewhere else, reverse it from the row menu here or from the Payments page. The invoice recalculates and the reversed payment stays in the history, struck through, with the reason and who reversed it. There is no undo, so read the confirmation dialog first.
Every payment in one place. Payments in the main menu lists invoice payments and quote deposits together, with search, filters and sorting. See Managing Payments.
Checking What's Owed
On Invoice Detail Page
The totals block under the line items shows:
- Subtotal - the line items before tax
- Tax (GST) - the tax on those lines
- Total - the invoice total
- Amount Paid - the sum of the payments recorded against it
- Amount Due - what the customer still owes
A quote deposit is not a separate total here. On a job's base invoice it appears as a negative Partial Invoice #... line among the line items, and the Total is already net of it. See Understanding Deposits.
In Invoice List
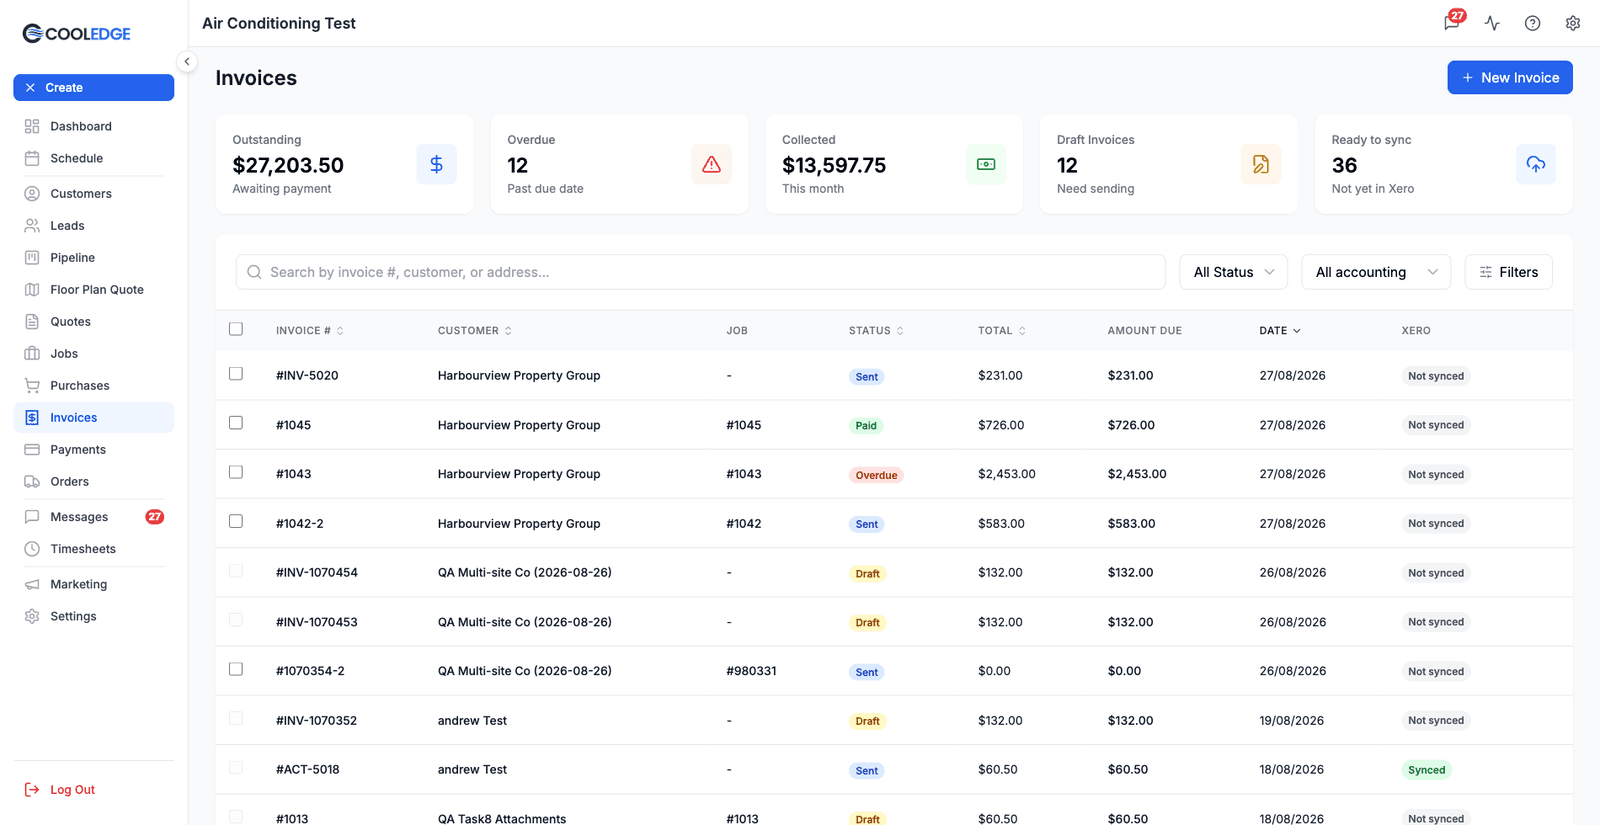
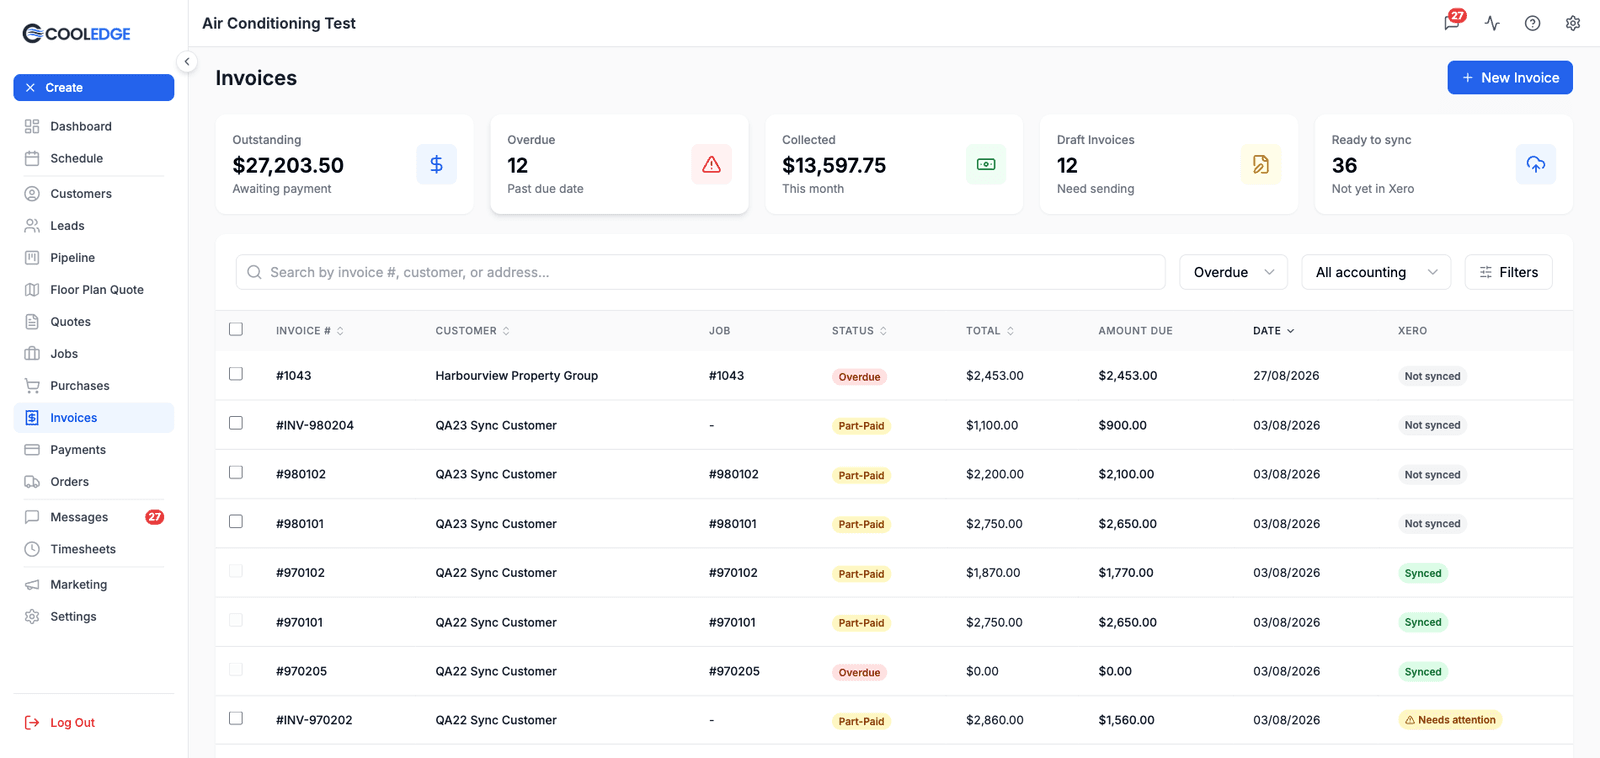
The main Invoices page opens with five summary tiles across the top: Outstanding (awaiting payment), Overdue (past due date), Collected (this month), Draft Invoices (need sending) and Ready to sync (not yet pushed to your accounting software). Each tile is clickable and filters the list beneath it.
Under the tiles you get a search box that matches invoice number, customer or address, an All Status dropdown (Draft, Sent, Overdue, Part-Paid, Paid, Void), an accounting-sync filter and a Filters button for the rest.
Email Sending Features
From Address
Emails come from your business name:
- Basic:
Your Business Name <billing@notifications.cooledge.com.au> - With Subdomain (Premium):
Your Business Name <yourslug@notifications.cldg.com.au>
The subdomain makes emails look more professional and improves delivery rates.
CC to Your Business Email
By default, you're automatically CCed on all invoice emails so you have a copy for your records. You can turn this off in Settings if you prefer.
Reply-To Address
When customers hit "Reply" to an invoice email, it goes to your business email (set in your profile), not a no-reply address.
Common Workflows
Scenario 1: Customer Pays Online in Full
- You create invoice and click "Send"
- Customer opens email and clicks "Pay Now"
- Customer enters card details and pays
- You get instant notification
- Invoice automatically marked as Paid
- Done! No further action needed.
Scenario 2: Customer Pays Cash On Site
- You create invoice and click "Send" (so customer has record)
- Customer gives you cash when work is done
- You click "Record Payment" and enter cash amount
- Invoice marked as Paid
- Customer already has emailed invoice for their records
Scenario 3: Customer Pays in Installments
- You create $5,000 invoice and send it
- Customer pays $2,000 deposit online → Status: Part-Paid, Owe: $3,000
- Week later, customer pays $1,500 bank transfer → You record it manually → Owe: $1,500
- Week later, customer pays $1,500 cash → You record it → Status: Paid
Overdue Invoices
An invoice shows Overdue once its due date has passed and it is still sitting on Sent. It is not a timer from the send date, so an invoice with 60-day terms is not overdue on day 31: it is overdue the day after its due date.
Two things worth knowing:
- The due date comes from your default payment terms, set in Settings > Invoice Preferences > Default Payment Terms
- A Part-Paid invoice never shows as Overdue, so part-paid debts won't appear in the Overdue tile
To follow up on overdue invoices:
- Click the Overdue tile at the top of the Invoices page, or pick Overdue from the status dropdown
- Open the invoice
- Use More > Resend Invoice to send it again
- Or call or SMS the customer directly
Best Practices
Send invoices immediately after completing work Don't wait. Customers pay faster when the work is fresh in their mind.
Use online payments when possible Online payments are instant and automatic, and customers can pay anytime. Much faster than waiting for bank transfers.
Record cash/bank payments same day Don't let manual payments sit unrecorded. Do it immediately so your records are accurate.
Check the Sent email worked After sending, check your CC email to confirm it went through. Occasionally customer emails are wrong.
Follow up on overdue invoices weekly Set a reminder to check overdue invoices every Monday. A polite email or call usually gets payment moving.
Common Questions
Can I edit an invoice after sending? You can edit invoice details, but major changes (like line items) should be avoided after sending. Better to create a new invoice or credit note if needed.
What if the customer says they didn't receive the email? Use More > Resend Invoice. Also check the customer's email address is correct on their profile.
Do I need a Stripe account? Yes, to receive online payments you need to connect your Stripe account in Settings > Billing & Payments. This takes 5 minutes to set up.
What fees does Stripe charge? Stripe charges ~1.75% + 30¢ per transaction. This is standard for card payments and much cheaper than merchant terminals.
Can I accept payment in person with a card terminal? Yes, if you have a Stripe card reader. Process the payment through Stripe, then record it manually in Cooledge.
What if I need to refund a customer? Return the money first: refund it in your Stripe dashboard if they paid online, or send it back the way it came. Then reverse the payment in Cooledge with the reason Refunded outside CoolEdge, which recalculates the invoice and keeps the record of what happened. See Managing Payments.
Related Articles
- Managing Payments - The Payments page, reversing a payment and linking one to your accounting software
- Creating Invoices - How to create job-linked and standalone invoices
- Understanding Deposits & Amount Due - How deposits are deducted from invoices
- Editing Invoice Line Items - Adding and editing items on invoices
- Understanding Invoice Numbers - How invoice numbering works
Was this article helpful?
Let us know if you found this information useful.
Still need help? Contact support
In this article
Use your browser's search (Ctrl+F) to quickly find specific topics within this article.
Browse all help articles →Related Articles
Creating Invoices
Learn how to create job-linked and standalone invoices, with automatic deposit deductions
Editing Invoice Line Items
Add, edit and remove line items on invoices including quantities, prices and tax calculations
Managing Payments
Find every payment in one place, reverse a payment that was recorded wrongly and link a payment to one already entered in your accounting software